Guideline I
Provide accessible multimedia in e-books.
Most e-book formats can accommodate multimedia in some manner, either by embedding the elements directly into the e-book, or by linking to them externally. Some formats and readers are more accessible to users with disabilities than others. Adobe Reader (PDF format) offers reasonable access to screen readers, provided the author has taken care to create an accessible document. However, even the most carefully authored documents may not provide a 100% accessible e-book due to limitations in the format itself or in the software used to read the book.
Before incorporating multimedia into any e-book, always be sure to add captions and audio descriptions to that multimedia. See Guideline H for details.
The information in this section describes procedures for adding multimedia — video or audio clips — to e-books in PDF, PRC and OEBPS formats on various hardware devices, such as desktop/laptop or handheld. Note that while the multimedia elements themselves may be accessible, the e-book readers for these formats offer varying degrees of accessibility. In the case of handheld devices, accessibility for deaf users is generally not a problem, but blind and visually impaired users may find it very difficult to use handheld devices to read e-books. Also see Guideline D for more discussion about e-book accessibility.
Checkpoint I.1
Integrate accessible multimedia into PDF e-books
PDF e-books support both embedded and linked multimedia. Embedded clips, for example, are convenient: the user need only download and open a single document, and no Internet connection is necessary to view the clips. However, depending on the size of the e-book and the number of embedded clips, the document size can become rather unwieldy. Linked multimedia, on the other hand, is comparatively easy to integrate, takes up minimal space in the book and is launched in an external player appropriate to the clip's format. However, the user must have an Internet connection to play the movies if they are server-based, or must download and install the movies if they are linked locally.
Technique I1.1
Embed multimedia into PDF e-books.
Once captions and/or audio descriptions have been added to the multimedia
, create a visible space in the e-book source to display the multimedia clip. If the book was authored in HTML, for example, use a of appropriate dimensions to make room for the clip. The CSS float property can also be used to create the space as well as to flow text around it. When the document is converted to PDF it will then contain a visible area into which the multimedia may be embedded.
Convert the source document to PDF, then open it in Adobe Acrobat Professional. Choose Movie Tool from the Tools/Advanced Editing menu, then double-click in the blank area you created on the page where the clip will be embedded. Browse to the clip, choose a poster option and select OK.
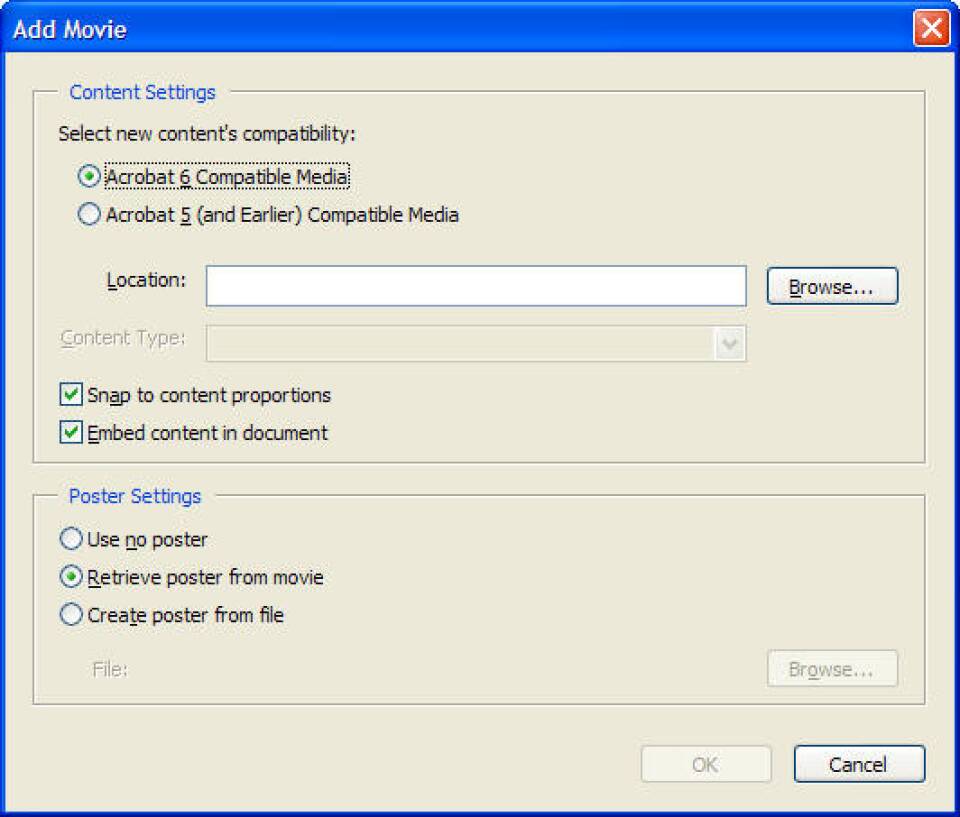
When the media clip appears in the file, drag it or use the arrow keys to position it (or right-click or use the context-menu key to make use of the Center option). Next, double-click on the movie to open the Multimedia Properties dialog (or right-click to open the context menu and choose Properties). In the Settings tab, enter alt text to describe the clip. Some users will find it helpful if you provide brief instructions on how to operate the clip, as illustrated in the image below. A screen reader will read this alt text back to the user when the clip has focus.

Now press the Edit Rendition... button and add alt text to the Rendition Alternate Text area in the Media Settings tab.
Next, choose the Playback Settings tab, as shown below.

Select the player settings you want, ensuring that the "Show player controls" checkbox is checked. Press the Add... button and specify which player(s) you want to use, as shown below. For example, if you're embedding a self-contained QuickTime (.MOV) movie, choose the QuickTime Player from the list.

If you are embedding a SMIL presentation, remember that SMIL created for QuickTime will work only on the QuickTime Player, and that SMIL created for Real will work only on the RealPlayer. (Support for SMIL in the QuickTime Player is selective, so test your presentation thoroughly before making it available publicly. Read about QuickTime's support for SMIL at Apple's Developer Connection site.) Because the QuickTime Player and RealPlayer both claim the .SMIL extension, specifying which player to use will avoid a player-fight when the user starts the movie. Also note that while various Windows Media formats are supported in PDF, those captioned with SAMI currently are not.
Press OK to return to the Multimedia Properties window, then select the Appearance tab. Choose the border options you want, then select the Actions tab. For maximum flexibility, select Mouse Up as the trigger, which allows activation using either the mouse or keyboard, and set the Select Action menu to Play Media. Click once on the rendition in the Actions menu, and then press the Edit button. Choose "Play" and then press OK. Press the Close button to save your choices and close the dialog.
Below is an image of an embedded QuickTime movie in a PDF e-book. Note the visible captions.

When embedding multimedia in a PDF e-book, ensure that the clips can be controlled by all users. Making the player controls visible, for example, allows mouse users to easily manipulate the clip (users can also just click anywhere on the clip to play or pause it). By default, keyboard users can control a clip by tabbing to it to bring it into focus, then pressing P to pause/play, S to stop and rewind completely, and the right and left arrow keys to move forward and backward, respectively. These commands are the same regardless of the multimedia format used.
Depending on the multimedia format, authors can also add controls directly to the movie. QuickTime, for example, can accommodate buttons directly on the user interface which can be programmed to toggle captions and audio descriptions on and off, as illustrated in the image below.

See Technique H2.3 for instructions on adding buttons to QuickTime movies. Once the controls have been added to the movie, it can be embedded into the PDF e-book as with any other clip, described above.
Informing the user about keyboard controls via a page of access instructions or even through alt text will aid screen-reader users or anyone who prefers to use the keyboard rather than a mouse. Consider placing a link to the instructions from the title page as well as the table of contents so users will find them immediately upon opening the book.
Be aware that some screen readers, such as JAWS, may make use of keyboard commands that conflict with some of Adobe Reader's keyboard shortcuts. For example, if JAWS is in use when a multimedia clip is playing, the P, S, left and right arrow keys cannot be used to control the clip. Instead, the user must first invoke JAWS' pass-through mode (Ins+3) before pressing the appropriate player-control key. (Window-Eyes, another popular screen reader, does not require users to invoke pass-through mode when controlling embedded clips in PDF e-books.) It is therefore imperative that you test the e-book for conflicts with screen readers before publication.
Technique I1.2
Link to multimedia from a PDF e-book
Relative to the embedding process, linking to multimedia clips is simple: just create the links to the clips when preparing the source documents for the e-book. When the source is converted to PDF, the links will remain intact. However, it's always a good idea to check Acrobat's work: open the document in Acrobat, choose the Link tool from the Tools/Advanced Editing menu and then double-click the link text to open the Link Properties dialog box. You can also right click on the link and choose Properties from the context menu. Select the Actions tab and verify that "Open a Web link" appears in the Actions list (and that the URL is correct), as shown here.

If Acrobat has specified an incorrect action, select the action in the list and press the Delete button. Open the Add an Action drop-down menu, choose "Open a Web link" and press the Add... button. Type the URL into the edit field that appears, as seen here:
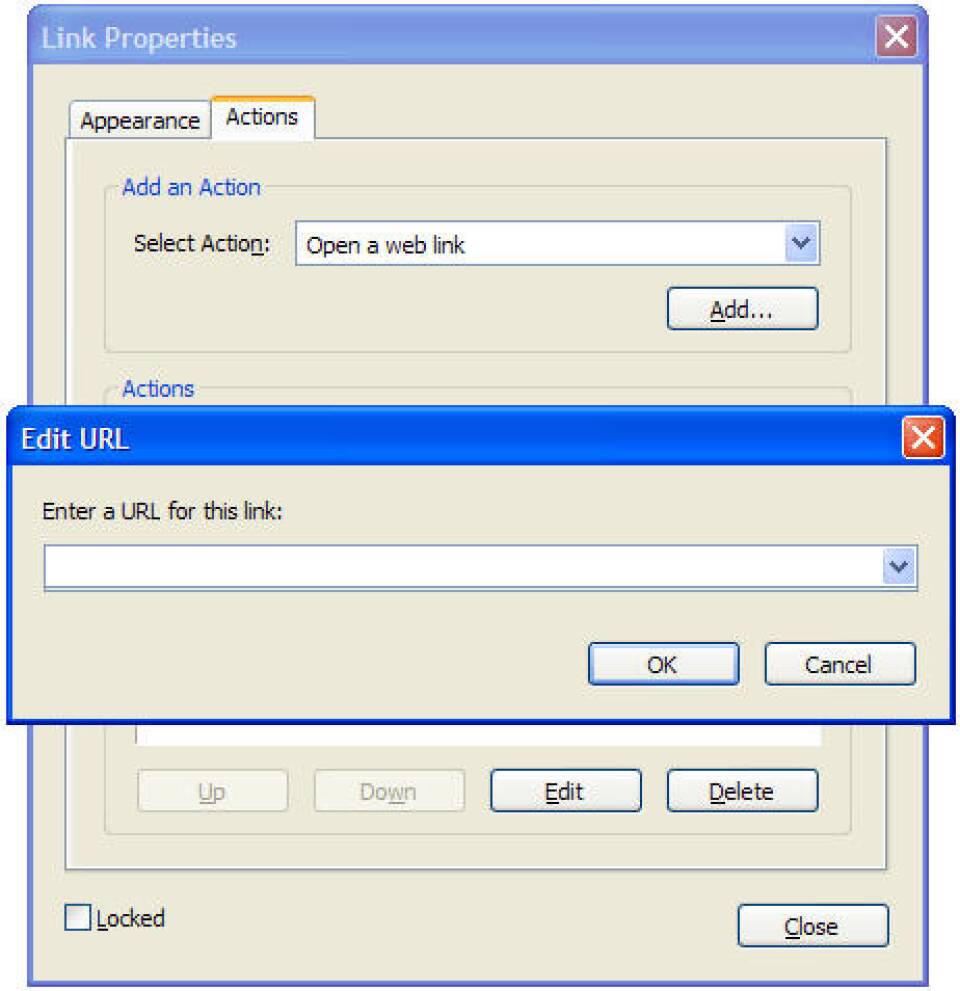
Press the OK button, and then press the Close button to close the Link Properties dialog box. Now, when the user selects the link, the clip will be launched in the appropriate player.
Choosing this method of integrating multimedia will make for a smaller document if the clips are to be played from a server, but will require the user have access to the Internet while reading the e-book. A safer alternative may be to deliver the multimedia with the e-book (in a ZIP archive, for example), linking to the clips stored on the user's computer.
In addition to keeping the e-book's size to a minimum, externally linked multimedia has accessibility advantages. Some screen-reader users may prefer to control a multimedia clip in its native environment, rather than using the unfamiliar commands necessary with an embedded clip. Additionally, authors can take advantage of the caption or audio-description support found in QuickTime, Real and Windows Media players, as well as the sophisticated layout and timing advantages of languages like SMIL.
As with embedded movies, consider adding caption or audio-description controls to the movies you're linking to. This process is described in Technique H2.3 .
Technique I1.3
Link to embedded multimedia in a PDF e-book
A hybrid option combines both linked and embedded multimedia: the movie appears to be embedded in the e-book but is actually linked from another location. Rather than creating a text link to launch a clip in a separate player, follow the steps for creating embedded multimedia, with one exception: when choosing the media source, type a URL into the Locations edit field in the Add Movie dialog box, as shown in the image below.
When the clip is played by the user, it will appear to be embedded when in fact it is playing from a server. The clip can be controlled with a mouse or with the same keyboard shortcuts used for embedded multimedia. A distinct advantage to this approach is that the e-book experience is contained within a single document while keeping the document as small as possible. And as long as the multimedia is properly tagged and clearly identified, it can be located and activated by the user.
Technique I1.4
Make multimedia in a PDF e-book locatable
Just as important as providing accessible multimedia is providing a method for locating the clips. One way to help users is to create a table of contents containing links directly to each clip. This may be done within the body of the source document, so that when the conversion to PDF takes place the table of contents is created along with the rest of the e-book. Another method is to create a table of contents using Acrobat's bookmarking capabilities, as described below.
- Open the document in Acrobat and choose View/Navigation Tabs/Bookmarks, or press F6 to open the navigation pane.
- Choose the Bookmarks tab.
- In the document pane, move to the first location where you want to place a bookmark, then press Ctrl+B or, from the Options menu in the navigation pane, choose New Bookmark.
- In the navigation pane, give the bookmark a name and press.
Below is a picture of an e-book showing bookmarked embedded multimedia.
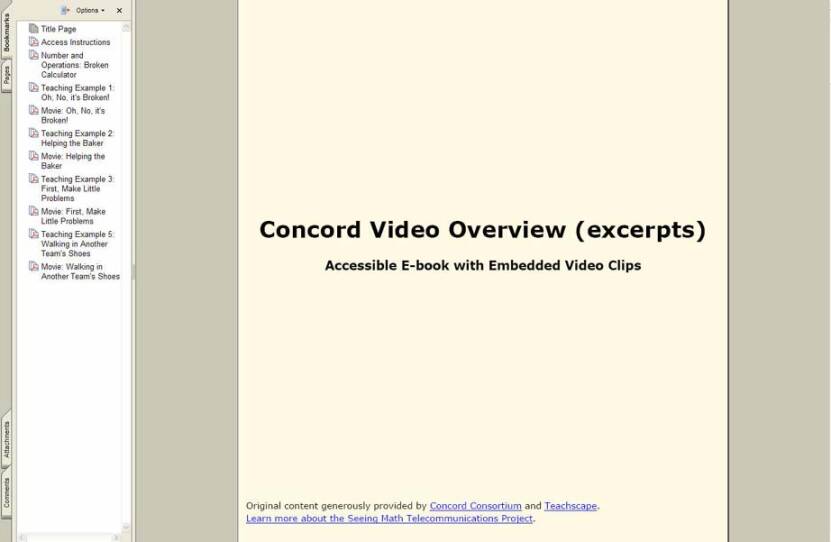
For easy identification, identify the multimedia as such in the bookmark: for example, "Movie: 'Oh, No, It's Broken'". When the user selects the bookmark, the focus in the document pane will shift to the bookmarked point. Selecting a bookmarked movie will also invoke the default action associated with the clip, so if you have selected "play" as the trigger (as described earlier), the clip will begin playing when chosen from the bookmarks list.
When identifying linked multimedia, screen-reader users will find it helpful if the link text states that the clip will open in an external player. For example, "Play the movie 'Oh, No, It's Broken' (opens in Windows Media Player)" is more informative than "Play the movie."
Checkpoint I.2
Integrate accessible multimedia into OEBPS-format e-books
OEBPS-formatted materials can be read by any reading system that supports the format. There are at least three native OEBPS-format e-book readers — Mentoract Reader (still in beta) and eMonocle —, meaning they render native OEBPS publications, just as a Web browser reads HTML files directly. A number of distilled formats also exist, such as MobiPocket's PRC, and eBook Technologies' IMP. These are optionally DRM-restricted e-books created directly from OEBPS source files. These reading systems will not, however, read native OEBPS files themselves.
Although OEBPS itself can embed multimedia using the element, most available OEBPS reading systems do not actually support embedded video or audio clips yet. However, authors can link to multimedia presentations outside the book, either locally or remotely. Linked multimedia takes up minimal space in the document (resulting in smaller e-books) and is launched in an external player appropriate to the clip's format. However, the user must have an Internet connection to play the movies if they are server-based, or must download and install the movies before reading the book if they are linked locally. Keep in mind that QuickTime movie links should refer to a QTL file, not the MOV file directly.
Technique I2.1
Link to multimedia from OEBPS e-books
Creating links in an OEBPS publication to external multimedia is no different than creating links to other resources, such as Web pages: simply insert the link when you are creating the source document:
<a href="http://ncam.wgbh.org/mymovie.qtl">Movie: How a Build Your Own Radio (opens in QuickTime Player</a>. Here are images of linked multimedia inserted into a native OEBPS reader, Mentoract Reader.

When identifying linked multimedia, users will find it helpful if the link text states that the clip will open in an external player. For example, "Play the movie 'Oh, No, It's Broken' (opens in the QuickTime Player)" is more informative than, "Play the movie."
To help readers become familiar with the accessibility features you have included in the e-book, provide a set of access instructions at the beginning of the book. Within these instructions you can tell users about navigational structure as well as information about multimedia clips (how to control them, for example, or how they are indicated in the book). Also ensure that the access instructions are available from the table of contents. Consider placing a link to the instructions from the title page, too, so users will find them immediately upon opening the book.
Checkpoint I.3
Integrate accessible multimedia into handheld e-books
There is currently no handheld e-book software that supports embedded video or audio. Therefore, authors who wish to include multimedia in handheld e-books must rely on linking. There are several e-book readers for both Palm and Windows Pocket PC/Mobile OSes, but their support for linking is not always consistent from one OS to another, and some permit internal linking only, not external linking. Below is a table illustrating the multimedia support in three popular handheld e-book reading applications. There is no native OEBPS reader for either the Palm or Windows Mobile OS.
Summary of two handheld software e-book readers and their multimedia support.
| OS | Multimedia support | Comments | |
|---|---|---|---|
| Adobe Reader | Palm, Windows Mobile | Palm: none Windows Mobile: linked | Multimedia must be downloaded first |
| MobiPocket Reader | Palm, Windows Mobile | Palm: linked Windows Mobile: none | Multimedia must be downloaded first |
Note that the Adobe Reader for Pocket PC can link directly to a multimedia clips without the user having to manually open a separate player, but the user must download the multimedia files to the device prior to opening the book. Installation of the multimedia files can be done while synchronizing the e-book from a desktop machine to the handheld device.
Authors wishing to integrate multimedia into Palm e-books can use the MobiPocket Reader . While MobiPocket will permit external hyperlinking to multimedia, the process of playing a movie requires manual intervention: when the user taps the link the device will download the clip, but then the user must manually open a multimedia player and then open the clip from within the player itself.
Technique I3.1
Integrate multimedia into Palm e-books
Integration of multimedia into Palm e-books can be accomplished using the MobiPocket Reader in conjunction with a Palm-compatible media player, such as the Kinoma Player . Kinoma-format movies can be created using the Kinoma Producer . Kinoma Producer requires the use of QuickTime Player , so the source media must be compatible with QuickTime. Formats include, but are not limited to, MOV, MP4, MP3 and AVI. Keep in mind that the target device must have the Kinoma Player installed ($19.99, although older versions are free).
No Palm-compatible multimedia player has provisions for toggling on and off caption or description tracks, so the only method for providing accessible movies is to supply open-captioned and/or open-described clips.
To create multimedia for use on a Palm device, first install the Kinoma Producer . Create the source media in a QuickTime-compatible format, such as MOV, and use MAGpie to add captions or audio descriptions to the video clip.
After authoring captions and descriptions in MAGpie as described in Technique H2.1 , export the presentation as SMIL for QuickTime. Then follow the procedure described in Guideline H for embedding caption and description tracks into QuickTime movies. Save the movie as self-contained, making sure that the caption track and audio-description track (if you created one) are on before you save the file. After saving the file, open the Kinoma Producer and convert the movie to the Kinoma format, specifying the target handheld device(s), then upload the clip to a server.
Because e-books in the MobiPocket format (PRC) are essentially OEBPS-format documents that are protected by DRM, you can author your source material in formats such as HTML, Word or text before converting them to PRC, where software will create the OPF file for you. (See Checkpoint D2 for discussion about OPF files.) Insert hyperlinks to movies where appropriate, with the URL being the Kinoma-format movie on your server.
To convert the source materials to PRC, use MobiPocket Creator Publisher Edition ($149), a full-featured application for converting and distributing content. You can also use MobiPocket Creator Home Edition ($29.95), which is best suited for personal use.
After converting the source, test the e-book by transferring it to a Palm device. The image below shows a page from a PRC e-book for MobiPocket Reader, with a hyperlink to a movie.

When the user taps on the link, the Palm device will download the movie and place it into the Kinoma Player's library, as shown in the image below.
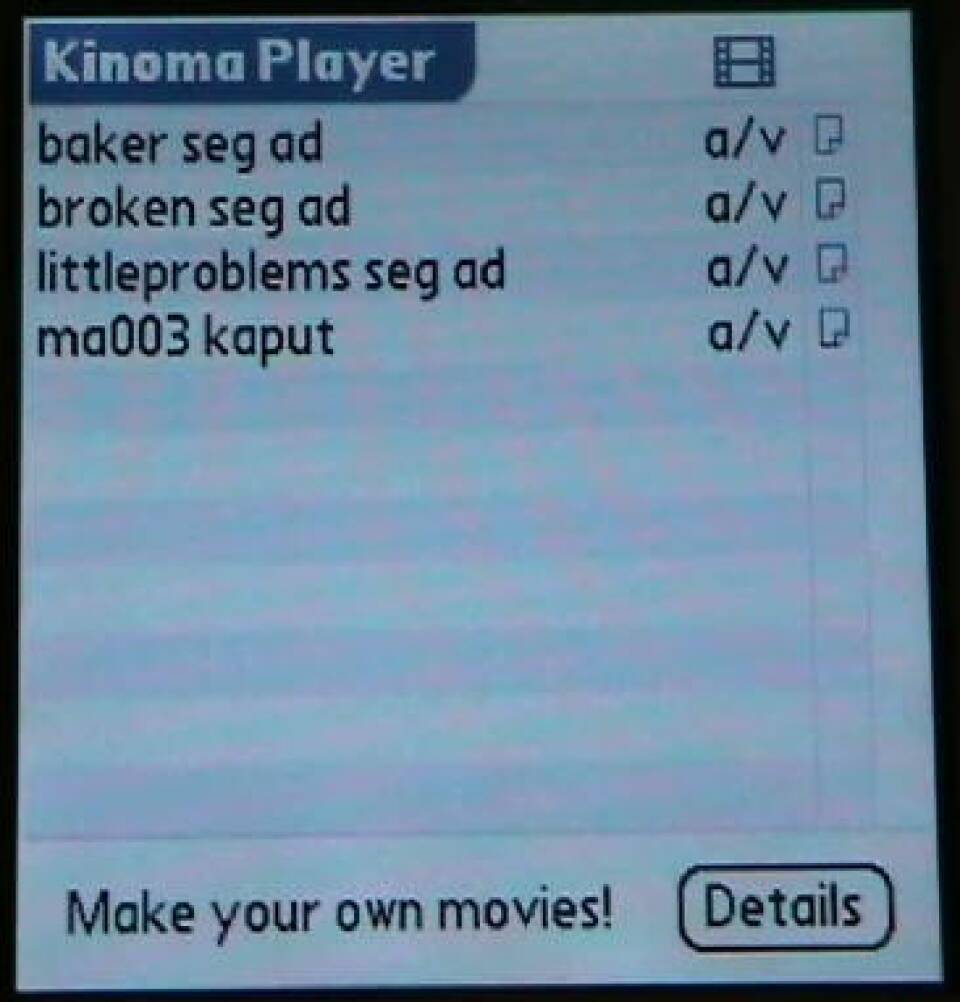
The user must now open the Kinoma Player and choose the movie from the library. Below is an image showing the Kinoma Player playing an open-captioned video.

Technique I3.2
Integrate multimedia into Windows Pocket PC e-books
As with Palm-OS devices, Windows Pocket PC/Mobile devices can display e-books that integrate linked multimedia. However, this OS makes it somewhat more convenient to link to and play media files.
There are several multimedia players available for Windows Pocket PC/Mobile, including (but not limited to) Windows Media Player, RealPlayer, and PocketTV. Because no handheld player currently offers the ability to toggle caption or audio-description tracks on and off, multimedia integrated into mobile e-books must be open captioned or described.
Two applications are required to create accessible multimedia for a Windows Pocket PC/Mobile device: QuickTime Player and Windows Media Encoder . For illustrative purposes, this example assumes an eventual target of Windows Media (WMV).
Because Windows Media Player for Windows Pocket PC/Mobile doesn't play SAMI captions or audio descriptions, you must first author the captions and descriptions in a format that can embed these accessibility features. You must then save the entire movie with open captions and descriptions before converting the presentation to WMV. QuickTime-supported formats (MOV and MP4, for example) work well as source files because QuickTime allows the embedding of caption or description tracks.
Start by adding captions and audio descriptions to the MOV source with MAGpie as described in Guideline H . Export the presentation as SMIL for QuickTime and then follow the procedure described in Checkpoint H2 for embedding tracks in QuickTime movies. When you're finished embedding the tracks, save the movie as self-contained, making sure that both the caption track and audio-description track (if you created one) are turned on before you save the file.
Next, export the entire presentation to an AVI clip:
- Open the accessible movie in the QuickTime Player.
- Choose File/Export, then Movie to AVI from the Export drop-down list, as shown below.

3. Accept QuickTime's default settings, or press the Options button to set your own parameters.
4. Press the Save button. QuickTime will convert the movie to the AVI format, complete with open captions and descriptions
Next, open Windows Media Encoder and follow the steps described below.
- Choose File/New.../Convert a file. Using the Wizard, browse to the AVI you exported in the QuickTime Player and then browse to the output folder where you want the WMV movie saved.
- In the next dialog, choose the target device. For this example, the target is Pocket PC, as shown below.
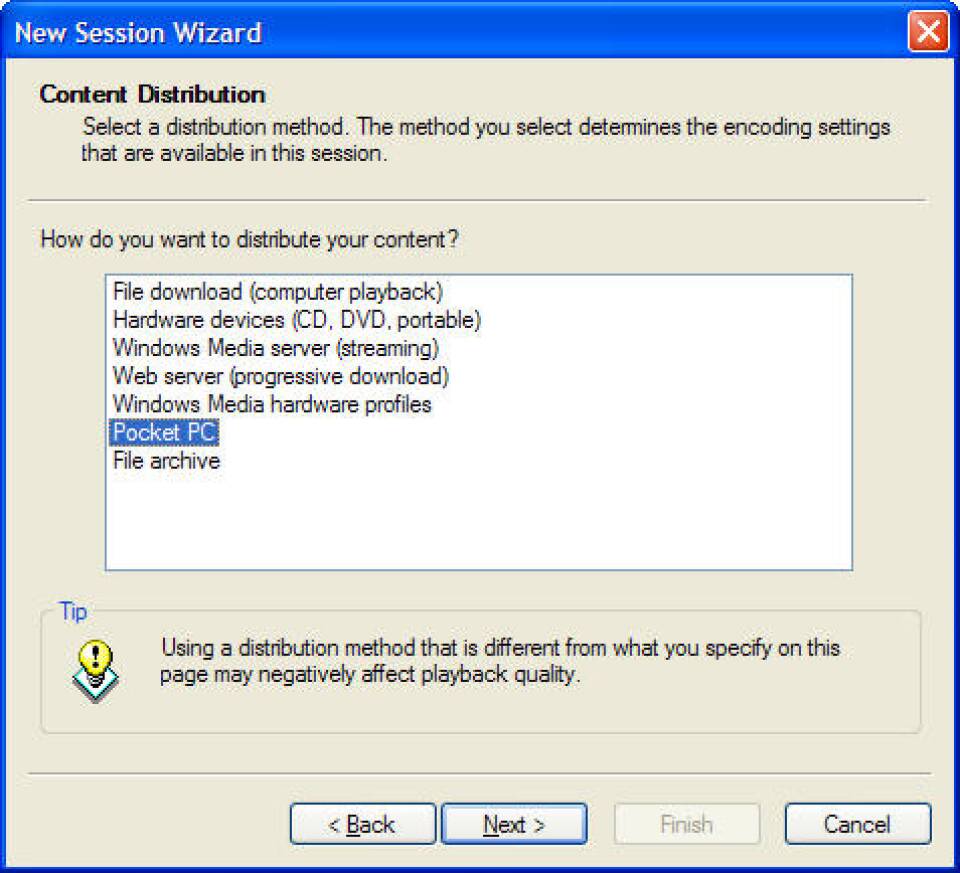
After selecting a target, press Next.
3. Choose whether you want to encode the movie as standard or wide-screen video, and choose CD- or voice-quality audio. Press Next.
4. Enter optional display information (title, author, etc.) and press Next.
5. Review the settings in the summary window. If you need to make changes, press the Back button. Otherwise, press Finish to begin the encoding session.
Once the session is done, transfer the movie to your mobile device and test it with Windows Media Player. If you find that the movie is too small or too large, you can re-encode it with custom dimensions: go back to Windows Media Encoder, choose View/Properties Panel from the menu bar, then select the Video Size tab. In the Resize area, select Custom from the Method list and specify the dimensions, as shown below.

Close the dialog when you're finished and press the Start Encoding button to re-encode the video. Transfer and test the movie again; repeat as necessary until you are satisfied with the size.
After you're done encoding all the movies, create the e-book for use on a handheld device, such as Adobe Reader for Pocket PC which provides support for linked multimedia. (MobiPocket Reader does not support external linking on this OS.) See Technique D2.1 for details on creating accessible PDF documents, and also read about adding linked multimedia to a PDF e-book . It is especially important that you place the multimedia to which you are linking in the same directory as the PDF file. Convert the text to PDF using Adobe Acrobat as described in Technique I1.2, then transfer the document and the movies, all in a single directory, to a handheld device for testing.
Open the e-book using Acrobat Reader for Pocket PC. Test a movie by tapping on the link. You may be asked to confirm that you want to open a movie. Choose Yes (or Yes to All), then the movie will open in Windows Media Player.